Showing posts with label Landscape. Show all posts

Tuesday, 13 May 2014

Evaluation

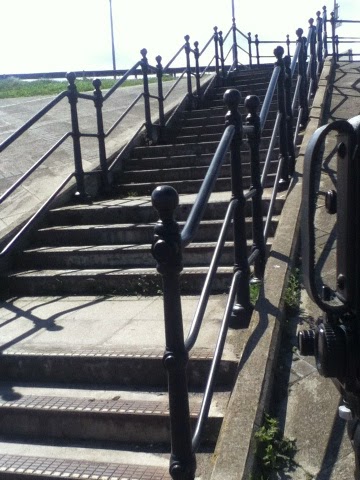
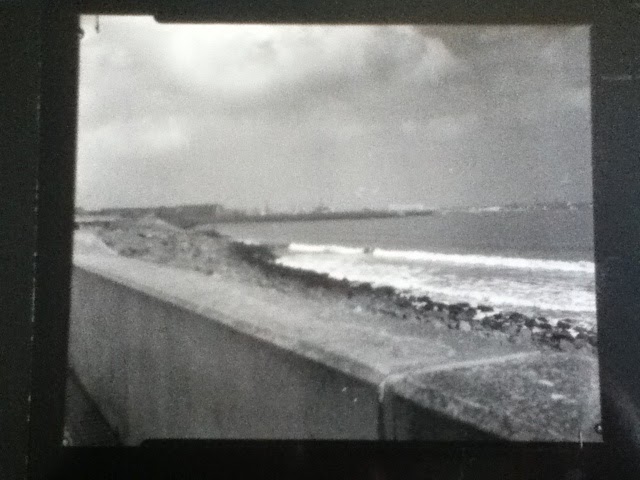
In this project I was photographing landscapes around Hartlepool, I have focused on the area around the sea front and found that I enjoyed photographing the details in objects more than the typically seen landscapes of wide-angle views of just land and sky with nothing in the foreground.

Robert Adams had an influence over my work because he shows urban landscapes in an artistic manner and in some of his work he has close ups of objects in the foreground. Another influence was Lewis Baltz as his work shows commonplace sights in a creative way. While I was out photographing I have not focused on trying to imitate the artists work but have used my location scout photographs to guide me.

I feel as though this project has been successful because I have learnt how to setup and use a new type of camera and how to work with a different type of enlarger. The work that I have done for this project has been successful as I have many enlargements that I feel I can use in my portfolio.

I think my work could have been improved by focusing my direction more as my final prints are split between looking at objects and wide-angle views. I could have improved this by going back to my location and photographing some more however I think the final five work together to show the location well.

I have learnt how to use a 5x4 large format camera in both the field an monorail models of the camera. I prefer using the field camera, as it is easier to transport to the location, because it is smaller and lighter. The Devere enlarger that was used to print the enlargements was very easy to use as it is very similar to the enlargers I have previously used.

The only major problem that I encountered was being able to get equipment, as there was only a limited amount available from the department. At first I thought that using the camera would be a problem that I would struggle with however I easily understood how to use it once I started.

During the project I had a contact review in which I received some helpful feedback comments about my developing process as I was getting a different development time on the edges of my negatives. I also received comments about the subject of my image that helped me choose my final images.

I feel as though my skills in film photography have been greatly improved because before this project I did not know how to use the camera and I am now looking forward to being able to use it again. I have also refined my darkroom skills as I can now confidently use both types of enlargers.

This project has challenged me to be able to work on location because I have had to load and change film in a dark slide while I was on location and I have also had to work on location with unfamiliar equipment. At the beginning of the project I was worried about my confidence holding me back however I feel as though I have gained confidence during this project.


If I was to do this project again I think I would take more photographs in a wider area of my location, as my images are concentrated on a specific part of the beachfront. I would also take more care while developing as my images have some marks which could have been easily avoided.

Wednesday, 7 May 2014

Archival Sleeves


Looking for sleeves for my prints and I have found a few websites that offer sleeves for my size prints:


Process Supplies

12x16" sizing
10 sleeves included
£15.22
( different delivery options ranging around from £2 to £8 )


Secol

12 1/8" x 16 5/8" sizing
50 sleeves included
£55.65


Portfolio Plus

12x16" sizing
10 sleeves included
£13.95
( £4.99 delivery)


Update

I ordered my prints from Process Supplies as I had used their company before, the quality is good and the delivery was next day. Now all I need is some clear labels for the sleeves.

While Printing


While I was printing my work I noticed a few faults on the prints that have come from the negatives, in future I will need to be more careful when handling negatives as some of the marks are very noticeable.


This is on the first lifebuoy image that I have taken, talking to the technician he said it looked as though the negative had been touched with wet fingers and some emulsion had been rubbed off the negative.


This is on my portrait image and I think the finger shaped watermark has happened while I was changing the film in the light tight bag while out on location, this was only the second time I had loaded film. I did not notice this when I was looking at the contact sheet however when inspecting the print I noticed it.


Re-shoot The Prints


These are the prints I have made from the photographs that I have retaken. Now all I need to decide on is my final five.

Re-shoot Image Four - Location Scout


I am taking this image again as the first time I shot it I used a very shallow depth of field and I am going to retake the image using a larger depth of field so more of the railing is sharp and it leads the eye through the image easier. 

Re-shoot Image Three - Location Scout


The first time I photographed in this location there was not a sign attached to the streetlight so for my photograph in this location I am going to composition this image differently so that it looks like the third image.

Re-shoot Image Two - Location Scout


Re-shoot Image One - Location Scout


In this location I like the railings and how they create shapes and lines leading the viewer through the images, however on the stairs is a stencil of a dog reminding their owners to clean the rubbish: I would not like this to be seen in my print however too much of the stairs will be cut out if I do not include it.

Wednesday, 30 April 2014

Possible Four Final Images


After speaking with the tutor in my tutorial he told me that these four were my best images and that I should use them in my final selection. I am going to see how the new ones I am going to shoot turn out and then have a look at my final images again.

Contact Sheet Review


Tuesday afternoon we showed our contact sheets to the group so that we could receive feedback and so that the tutor could see the work that we had done so far.

At first the review was not very helpful as I was wanting some feedback about the subject I had photographed however there was more technical information given about why the sides of my print had been developed more than the middle.

But I did get some comments about my subject and a possible direction to take the final five in.

After my tutorial with the tutor this morning I am planning to go and take a few more photographs that will help me create a sequence with my final five (if the weather clears up as I am wanting clear skies and contrast in the photographs.)


Tuesday, 29 April 2014

Another Four Photographs - Contact Sheet


These are the contact sheets of the images I took, I think the first and the third images are more well composed then the other two as the second image looks as though I have squashed the view of the railings into one corner and the last image is focusing more on the wall than on the rocks and the waves which is what I had wanted. The shadows in the first image add just a little extra detail which makes the photograph more interesting and the way I have composed the third image makes it feel as though the viewer is stood on those stairs looking down them.


Thursday, 24 April 2014

Another Four Photographs


We went out on another shoot as the weather was bright and sunny and the contrast would be great, I focused on a railing and set of stairs as the shape the lines created led the viewer right through the photograph, the shadows were also interesting as it almost looks like a reflection on the floor. I took an image facing out towards the sea with the Highlands in the distance, I am not sure about how this image will turn out compared to what I was thinking but I am hopeful it will work.

I have developed these and should hopefully be in the darkroom printing contact sheets this afternoon.

Wednesday, 23 April 2014

The Next Four Photographs - Contact Sheet


So we got into the darkroom to make contact sheets of all the negatives and this is what my prints look like:


I am happy with how they came out as they are well exposed and they are all in focus. With the second image I wanted to play with the depth of field so I focused on the wall in the foreground and used a shallow depth of field to have the rocks in the background slightly out of focus.

The last two images are my personal favourites from this shoot as I feel I took more care in composing them compared to the first two. 

The sides of the prints have been developed slightly more than the rest, this is because of the clips that hold the negative in the developer means the developer chemical runs down over that section more than the others.

Tuesday, 22 April 2014

Machine Processing or Tray Chemicals


In the darkroom there is two different ways to develop the contact sheets and enlargements; tray chemicals or a processing machine.

Tray Chemicals

Are more used when using resin coated paper and the technician does not recommend the students using the chemicals if we are not using this type of paper as it is an unnecessary health and safety risk, we were also told that is wasting chemicals because so much is left unused.

Some people prefer using the chemicals because they like to watch the process to make sure it has gone right and easily take the paper out of the process if it is not right. Another reason is that they can make sure the print does not get scratched or damaged during the process.

Machine Processing

This is a handy machine that develops, fixes and washes the prints. the technicians recommend this process as there is no chemical waste and it is safer as the chemicals are contained and there is no chance of spilling them on ourselves.

This process is easier than the trays because the whole process is automatic however there are some problems that can occur with this process; sometimes prints come out with scratches on them because of the rollers, and there is always a chance of the machine breaking if people are impatient and do not leave a suitable gap between the prints another thing that can happen if people are impatient is prints get stuck together so they are not developed fully.


I like to use the chemicals because it feels like I am doing more work and not just sitting around waiting for the machine.

Using the Enlarger


Once the film has been developed it is called a negative, this is because the black appears white and the whites appear black. In the darkroom is where a positive image is created, first in the form of a contact sheet.

Contact sheets are very useful to keep with the negatives as they show exactly what the image will look like when enlarged into a full print, they are easier to look at than the negatives as all the exact details can be seen on the contact sheet. Contact sheets are named as such because the negative is in contact with the light sensitive paper.

The negative is reversed into a positive because as the light from the enlarger exposes the paper the black on the negative blocks light coming through and the whites expose the paper; this means that where the paper is exposed it turns black and where there are blocks (the black and grey on the negative) it leaves the paper white and varying tones of grey.

The university has two different enlargers in it's black and white darkroom, for this project one type is being used for making contact sheets and the other is being used for making prints as this enlarger is the only type larger enough to hold the 5x4 negatives. One problem with this is that there are not enough devere enlargers for everybody to use and equipment is going to be difficult to get hold of.


Step by Step Using the Enlarger


Collect the negative carrier, lens, filters, contact board and focus finder from the photography store.

Make sure you have paper and negatives.

In the darkroom attach the lens and slide the negative carrier in.

Check the size of the light and adjust it so it covers the size of the contact board, then stop the lens down by two or three.

With the light off set up a test strip with the negative ontop and expose for 5secs, then cover most of the image with a strip of card.

Then move the card and expose more of the negative for 5secs, continue this until only a small section of the negative remains covered.

Develop using either tray chemicals or a processing machine.

Decide on a time to print the contact sheet on, then print and develop it.

If you are going to print an enlargement of the negatives then in the darkroom slide the negative carrier out and in the light line the negative up with the sides of the carrier ( shiny side up and so the bottom of the image is at the back of the negative carrier )

Slide the negative carrier back in the enlarger and turn the focusing light on (not before checking your paper is all covered) then size the image to about what you need it to be and then focus it by eye; fine focusing can be done with the focus finder, using the magnified reflection to find the grain which comes from the negative. 

Now run a test strip the same way as the contact sheet, develop it, decide a time and use a full sheet to expose the full image and develop.

Some minor changes may be required such as dodging and burning to bring in more details in sections of the print. Dodging is done by covering a section of the paper between the paper and the lens, this gives the covered section less time than the rest and makes look lighter, this is useful for recovering details that have been lost in shadow. Burning involves leaving the section exposed to give it more exposed making this darker than it should have been, this is useful for when sky has no detail and some can be brought in.

Filters can also be used to change the contrast; using a 0 filter will bring out the whites and using 5 filter will affect the blacks. The filters inbetween affect both by some varying degree, however the 3.5 filter will print as though there are no filters in as it affects black and white equally.

Thursday, 3 April 2014

Developing The Next Four Photographs


Setting up in the processing room


Developing the film is quite different to working with the 35mm film as everything happens in a light tight room and if something goes wrong you have to solve it while in the room (or take all your negatives off the frames and load them back into a light tight bag, leave the room and solve the issue then reload the negatives back onto the frames - yes this happened to me)

Before we could go in to develop we had to warm the developer up as it was too cold to use, this took a while but eventually we got the temperature up to 20 degrees and were able to go into the room.


Heating up the Developer
Developing times due to temperature


Me and a friend both went into develop our films together and we found that we work well as a team in the process: I struggle with loading the film onto the frames but have no problem doing the developing process.

We started by only developing one negative each to test the developing time as it was quite used developer, we estimated that we should develop for around 10 mins instead of 7 mins and this worked great as the negative came out well contrasted.

We then developed the rest and should be printing contact sheets soon so I will uploading them soon.

Wednesday, 2 April 2014

Meeting Ian Macdonald


Ian Macdonald gave our course a small preview of some of his prints and this was helpful to me because I had not seen many actual prints (that have not been done by me or on a wall in an exhibition) and seeing the amount of detail possible in them was inspiring.

He also showed us the affect the type of paper has on the overall look of the image, some papers are warm and some are colder, he also showed us glossy and matt prints and personally I prefer the matt as there is less light reflections covering some of the image.

The amount of care and detail that goes into every print is amazing as I had not realised how much it takes for prints to be completed, fixing little speckle marks that have appeared on the paper is not something I have ever thought about doing but it made me realise that even experienced film photographers get dust and little scratches on their negatives and it made me less worried about the prints not being perfect.

Getting Equipment Issues


Ok so once again there is no double dark slides left in the store in the department. People have taken all of the dark slides out or people have not returned them, so I can't photograph anything till probably late this afternoon.

I decided to look online to see if I could get my own so that this problem did not come up again and right now I can't afford to buy my own as on average it costs £40 just for one and I would want a few.

Hopefully some come back into the store for this afternoon so that I can go out and take some photographs as I won't be able to over Easter break and there won't be much time after the holidays.

The Next Four Photographs - Location Scout


Me and a few friends went on a location scout and I took some photographs of possible things I could return and photograph.

I explored close up details within the landscape as I found these to be more interesting than the wider view.

I am going to look at the stairs and railings and I would like to look at the life buoy.


Tuesday, 1 April 2014

First two photographs


26.3.14


26.3.14


These are the images I took on my first trip out with the camera, the first image is the best as I have been more creative and the image is more interesting. I am going to try retaking the second image but making it more interesting to look at.