Showing posts with label The Studio Portrait. Show all posts

Tuesday, 14 January 2014

Project Evaluation


The aim of this project was to teach us about working in the studio, to learn this I have taken a set of portraits with a winter theme, as it is cold outside so I have plenty of available models. I have used both soft-box’s and a beauty dish while shooting with a Hasselblad camera.

My main artistic influences were; Lutz Mahnhardt as he has shot glamour fashion portraits, Dan Newton because of his work with winter the theme, Luigi Gariglio as he has used a white background and the shadow detail is not too harsh but still noticeable and Valerie Belin because the lighting she has used draws the attention in to the models facial features.

I feel like this project has been a success, as I feel confident in using both the studio and the camera. My prints have been successful as the main focus is on the face yet I have incorporated fashion within the portraits.

To improve my work I would maybe use a model who I am more familiar with as the quality of the photographs is way less than it should have been as I was uncomfortable shooting him, I think the fact I was also new to the studio and camera did not help.

In the studio I was using a Hasselblad camera, which I have never used before so I struggled at first with focusing the images but I managed to get focus in most of my images. I have worked in the studio before however I had not worked with beauty dishes or some of the different lighting setups.

I did not encounter any major problems in this project although a few little easily sorted problems did crop up along the way. The first was focusing, I struggled at first with getting the correct focus but with some practice behind the lens I got it working another was the printing website not accepting my payment method but I got them sent of with a friend and everything was sorted.

I have developed my skills in the studio by getting introduced to new lights and lighting techniques. I have also learnt about the Hasselblad camera and have started to understand how to set it up with a digital back and to use it.

I think this project has challenged my ability to photograph new people as I photographed somebody who I had never met; this came with the realisation that I would need to work on my confidence when working with models because I would be working with new people when working professionally.


If I was going to do this project again or even continue in the future, I think I would prefer to work with models I know and have the friendship level with however I also want to push my self and work with new people.

Thursday, 9 January 2014

Final Three


These are my final images that I have sent to the printers, I cant help panicking that I have forgotten to do something though (that may just be me as I tend to over worry about things.)


College Portraits


I have worked in the studio before and I have photographs of work I have already done, some of my ideas from this project came from looking back at previous works such as using the fan on the models hair.

Perfume Advertising


These photographs were taken as both a favour for the models and to create an advert for a perfume that would be worn by a woman going on a romantic evening date.
I took them using two softbox's on the background and a tungsten light on the models.

Fashion collaboration 


One project in college was to collaborate with another course in the college and to create advertisements for the course that could be used in posters, brochures or online.
The course my group got was the Fashion course (we were pleased, everybody wanted that course) so we helped them out as they needed photographs creating for their portfolios, we knew they would wanting their best pieces of work photographing and this would help us with our project.
This was taken with a black background and one softbox in a high slight side light.


Final Major Project


These photographs were taken for my FMP, I was focusing on different stereotypes people assume that teenagers are. I was looking at the typical fashions within the groups and the accessories that they wear.
These were taken with a softbox on the side of the model pointing towards the model and the background.

Cropping and Printing


Digitalab

As I am sending my prints larger than A3 I will need to send them as tiff files with a 305 dpi. There are not many options with the choice of paper either glossy or matt, and then either with a border or without, personally I would prefer more options to be available as there are many more paper types to choose from

Print Space

I find this website is more user friendly as the options are easily seen across the top of the site plus the print and the delivery price is easily available before ordering anything.

Print Space price calculator (one print)

Delivery pricing

As my payment method would not be accepted on this website I ordered my prints through a friend while she was ordering hers, this meant that she was ordering 6 prints at once which gave us a discounted price (which comes in handy when surviving on a student budget.)

After looking at different professional printing labs websites such as Print Space and Digitalab I have decided to go with Print Space as they give me a price straight away before ordering and their delivery time is quicker than other sites.

I have decided to send the cropped version to the printing lab as then the three images look connected and as though they are a set. If I was going to be printing just the photo on it's own I would have left it as a full version, however I think this will look odd in comparison to the other two.

She shall be sending them to print today so that I shall get them back on Monday hopefully.


Wednesday, 8 January 2014

Help


So while editing in Capture One I sharpened the RAW files and slightly edited the contrast and lightened the exposure on this image so that it was visually similar to the other two.

After editing the other two I decided to see what he would look like if I cropped in closer so that he matched the style of the other two photographs, however I am now not sure if I prefer the cropped or the full version. I asked people but they came back with mixed opinions..... HELP :(


Capture One


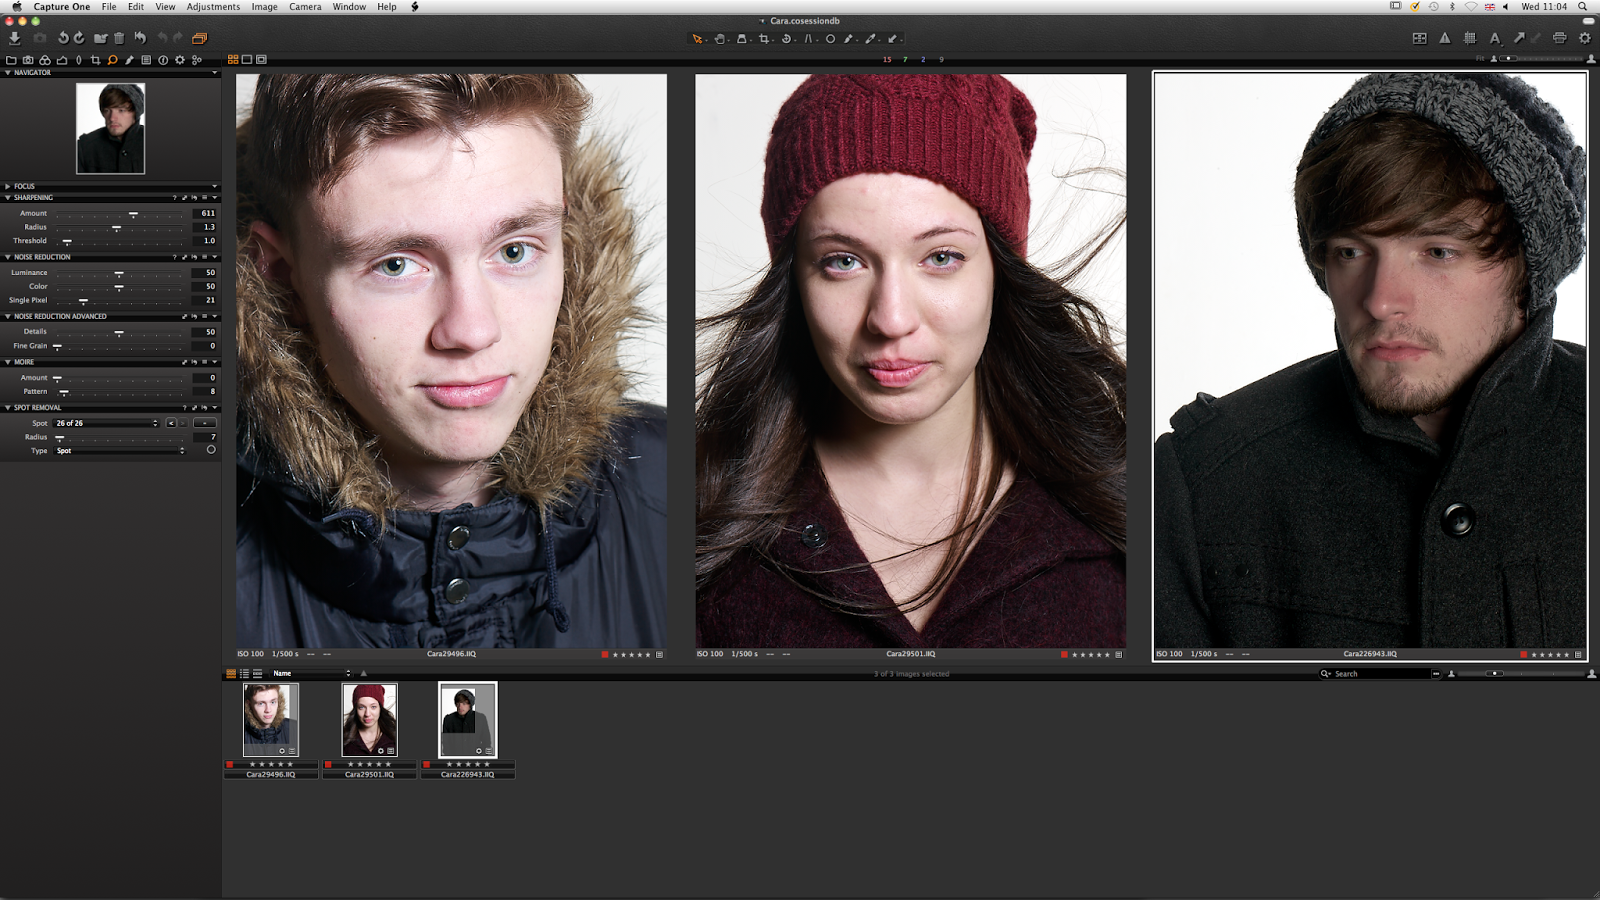
Capture One user interface
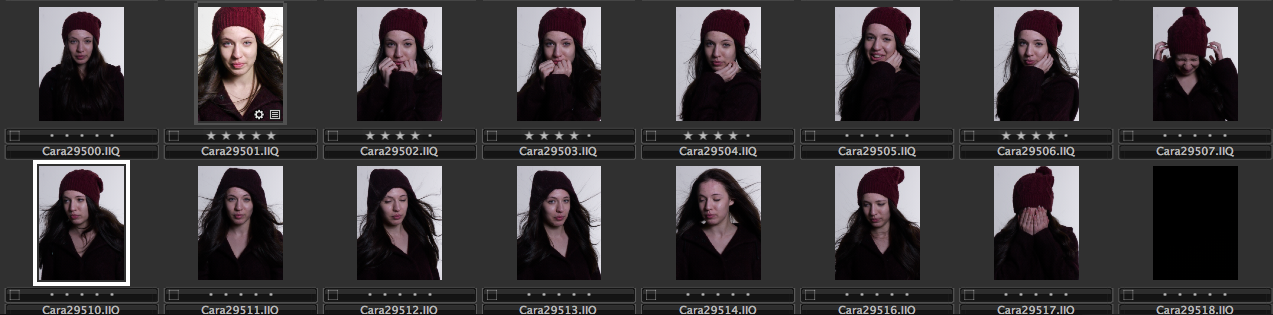
For my session that I have created for this project I imported all the RAW files from each shoot so that I can compare them together on the screen (see above)

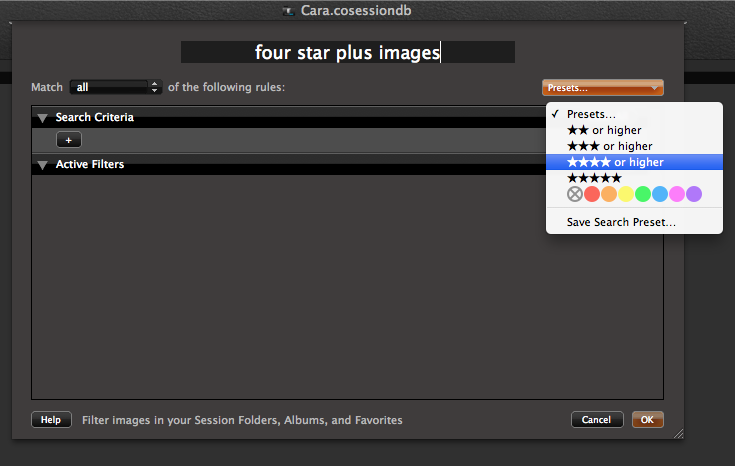
At first when I was sorting the files out I five starred each image that was successful but as I narrowed down my choice of final images I removed the fifth star from each one that is not in my final selection (this is so that I can still compare them by using the "Smart Album" system to view four star and higher rated images)

Smart Album pop up window

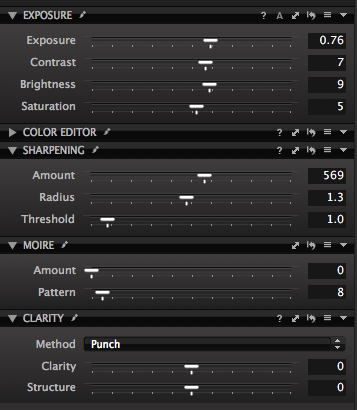
I then sharpened all of my final images so that the detail was clear and sharp, but not over sharpened so that they look "crunchy" (as my tutor described it) 


Some of the tools available
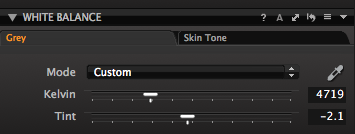
These tools are only a small selection of the ones available however these are the main ones I used for this project. I changed the exposure slightly as not all of the images had the same exposure so I changed it to make them feel more like a set, I also changed the brightness and saturation on one of the images to remove a slight magenta cast, however I was struggling with doing this until I was shown how to use the white balance tool (this worked so much easier than what I was doing - not surprisingly!)

White Balance slider

Hasselblad camera


For this project we are using the Hasselblad camera with a Phase One digital back, I'm looking forward to getting to use this camera as it is new to me.


Because we were using the Digital back we were shown how to remove the film back and replace it with the digital back:

Attach the back from the bottom using the two clips then push in the top till it clicks 
Remove by sliding the release catch at the top of the back then gently pull away at the top to remove the bottom clips


At first I struggled with setting up the camera as I was wary about breaking it, but once I realised that it could not be broken as easily as I thought then I got used to setting it up and swapping the backs, I also set up the connecting wires between the lens and the digital back and the wire between the back and the computer so that all of the images I took were transferred into my Capture One session not forgetting the sync cable required between the back and the flash (the connection was a little loose and the sync kept falling out, but that was easily solved by wrapping my headband around the back and sliding the cable underneath to hold it in place) 


I did struggle with focusing the images at first and it took my a while to work out but I eventually got my eyes adjusted to looking down into the lens to focus, and my final three images are all in focus. I think this may be something I will need to practice more with in the future so that when I am using models I can not worry about being in focus and only focus on posing the model and pressing the shutter.

Second and Third Shoot


For my second shoot I have used the same style as the previous shoot however instead of using a soft box I have used a beauty dish.


I used a model that I have never met before and I think that this is shown through the work that I have taken, however he was a good model to use as I like the fur around his hood.


I took some photographs of my model in her hat and coat (she didn't mind being dressed wintry as the studio room is quite cold usually.)
I was thinking about creating a windswept look as winter is typically cold, rainy and windy, in order to do this I have used a fan placed underneath the camera so it is directly centre to the model, as she has quite light hair there was not a lot of difficulty getting her hair to look flyaway.


First Winter Shoot


So for my " theme " I decided to go with the winter fashion portraits as I would have access to more models and I did not have access to coloured gels (I am still wanting some so I may experiment at home with homemade light covers in the future.)

I made the background white by using two soft-box's, I decided on using a white background so that it represents snow.

Then I lit the model with a soft box in a high slight side light, this is my first shoot :


I used the star rating to organise which photo's I thought were successful or not and realised only one model had any stars. 

The image that has five stars is a possible final image, in this preview the image has been slightly edited as I decided on using this image as a final.

Tuesday, 7 January 2014

Photography as Stage


I got this book out of the library at the beginning of the project because I found some interesting lighting styles in this book and some great ideas for my project, even if I don't use them for this project it will still be good to have to look back at.

(I took some images of ones I found that I thought could be useful but forgot about them until now) 

Jean Baptiste Huynh


A black background can always add dramatic effect and make the subject stand out, but sometimes details can be lost, this is not the case with these photographs as the background has been exposed differently (darker / lighter) to the model. There is quite an obvious side light set up to create shadows down only one half of the face, the light is on different sides of the models but typically it is set up on the left as we read from left to right so our eyes usually follow the same rule when viewing photographs, I am not saying that the light must always be on the left though, it all depends on what the subject and purpose of the photograph is.

Valerie Belin


The slight side light used in these helps draw the attention to the faces in addition to the models not wearing visible clothing. I like how they do not have direct eye contact as it makes me more interested in the photographs as I want to know what has captured their attention (even though I know it would have been the photographer posing them and they are not actually looking at anything else)


Luigi Gariglio


The photographer has used a slight side light for the first image, I think this is because it balances the image out as her hair is in her face on the opposite side. Whereas on the second image the model has not got long hair down the side of her face so the photographer has used a frontal light to equally light both sides of the face.

Robert Mapplethorpe


In this image the model is not looking at the camera and has her eyes closed, this gives me the impression she is dead as I cannot see the light reflections in her eyes which gives the viewer the impression she is alive. The lighting set up looks to be a frontal light with two black reflectors on either side.


Wednesday, 11 December 2013

Colour


I found these images while looking into creative ideas in the studio, they have been taken by using coloured gels and this is something that I would love to try in the studio sometime in the future (probably not this project as I would have to rush to get the gels and learn how to use them fast, I would prefer to be able to take more time learning with them and experimenting with different outcomes)


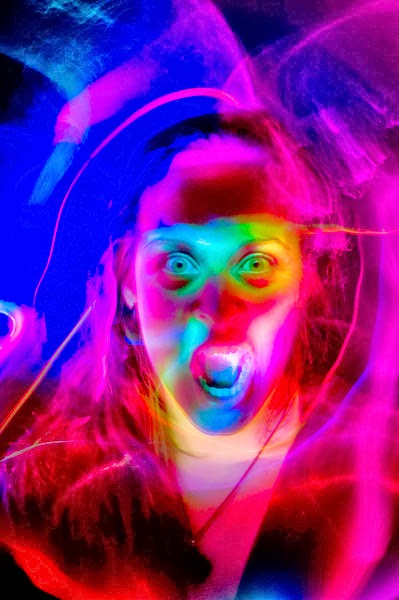
Julian Cash


These images have been taken in the studio using torches and light painting, I would like to try creating something similar by using coloured gels on the lights and torches. (I have done light painting before but only using one torch and colour so it would be fun to use more than colour at a time.)


http://www.juliancash.com/view/jc_edible/set/large_foo_1503.html
http://www.juliancash.com/view/jc_edible/set/large_foo_1606.html

http://www.juliancash.com/view/jc_edible/set/large_foo_1479.html


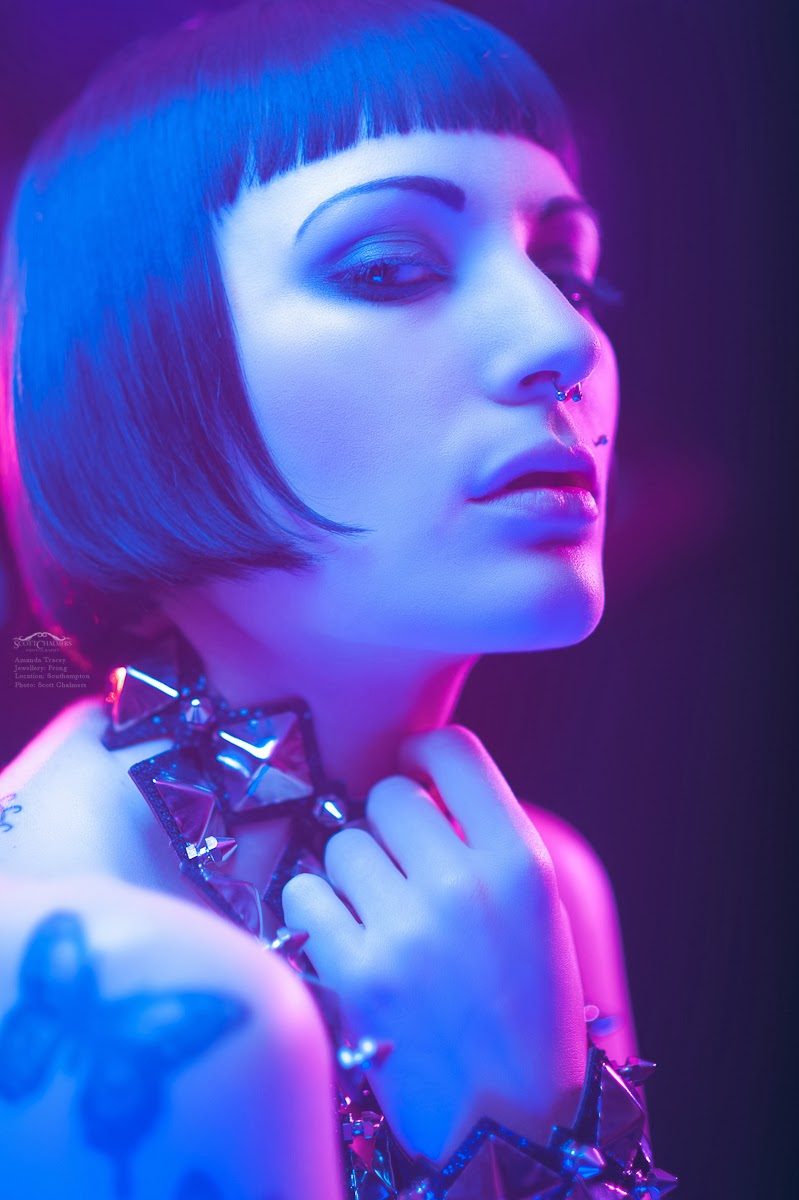
Scott Chalmers

These have been taken using coloured gels over the top of the lights in the studio, using coloured gels is easier and faster than spending time retouching in Photoshop to get the same effect. Plus while shooting if the lighting does not look exactly right for each individual pose the model is doing it can be easily changed whereas on Photoshop it would take hours to adjust each image separately.


Neil van Niekerk


The coloured gels don't always have to be used on the model, they can also be used to add some colour into the background like in these images:


I like the way the background adds a dramatic effect and looks to me as though an orange coloured backdrop has been used instead of using a gel. This is easier than buying different coloured backgrounds and having to re-set up the backdrop for each shoot or even during shoots.


DIY


I had not heard of using coloured gels over the lights so this is something that interests me, so that I could practise easier and quicker than with buying gels (because I have no idea which are good and which aren't) I looked into how to create home made coloured gels, on a website called Digital Camera World I found an idea that I am going to try... cutting up plastic wallets, only I am going to use the coloured section dividers in an old notebook.

DIY Photography Hacks : macro studio

Wednesday, 4 December 2013

Studio Artists


Denis Firman


I love the use of shadows within the photographs as it puts the model into a location instead of being just on a white background as sometimes the model looks a little lost within the photograph as there is only negative space around them.


Steve Kraitt

http://www.kraitt.com/#a=0&at=0&mi=2&pt=1&pi=10000&s=0&p=0


http://www.kraitt.com/#a=0&at=0&mi=2&pt=1&pi=10000&s=0&p=0

I think the effect created within these photographs are unusual and different and I would love to try creating my own similar photographing using light painting.


Lutz Mahnhardt


http://www.mahnhardt.de/people/studio/studio.html


http://www.mahnhardt.de/people/studio/studio.html
These studio portraits are quite simple in their composition and I would like to create similar style photographs, showing the personality of the models.


Dan Newton


http://www.liquidinplastic.com/2011/02/val-in-the-snow/

For the theme of this project I would also like to focus on people with hats, gloves and scarves on to cover themselves from the cold, I think this will help keep the model relaxed if they are not used to being infront of a camera as they will feel better having some shelter from the camera. It also means that plenty of models will be available as people will be wrapping up warm now it is winter.