Friday 12 December 2014

Professional Considerations


While out photographing the hardest part of the shoot was finding models to agree to stop and be photographed, this was made harder as we would not ask certain people to model as it seemed rude or unethical, people who were with children we did not ask or people on the phone as these would not want to be disturbed and the parent/guardian of the child may think we are targeting them for the child, also we did not want to keep them out in the cold for longer than they should have been.

We sometimes felt that we must rush through the taking of the picture as we did not want the model standing in the cold any more than we had too be there. Many of the models were more lenient with the time we took as we may have told them it was our first time out with the camera and we were only just learning how to use it, this gave us more time as many of them relaxed slightly (probably thinking that their image wasnt going to work.)

While shooting we remained polite and courteous and if people did not want to be photographed we accepted their decision and moved to find another person, we also asked if they would like to leave details with us so that they could receive a print once we had done it, this they appreciated and one person left his details with me wanting a copy of the photograph.

http://www.photoshare.org/resources/development-photography-ethics


Wednesday 10 December 2014

Using B+W


How I Did This

I took the photographs using the 5*4 field camera out in Church Square, I have gone out in a group of friends and we have all helped each other with setting up the camera and the focusing. To make things easier for ourselves once we set the camera up in the location we wanted we taped some masking tape down on the floor so that when the stranger came to pose for us we could ask them to stand in the box so the background would be how we like it and we did not have to rearrange the camera and the focus would stay relatively the same with just minor adjustments needed.

Why I Did This

I went out with hopes I would find people with interesting characteristic faces, and I have; the people I have chose I think have interesting and different faces. Although I rated potential strangers on a 'scariness scale' and dare not ask certain people I managed to find interesting people.

What Would I Change?

If I were to restart this project I think I would explore further afield because different types of people will be found in different locations.

What Do I Think of This

I particularly prefer the photograph of the college student (20*24 print) as his facial expression draws me in to his face and the details in his hair stand out because of the sharp focus. I also like the way the background is over exposed as this means all the attention is on him and there is no distractions in the background.

Developing

The developing process this project seems easier than when I did it for the Landscapes project, I think this is because I am more comfortable with the process and being locked in the room in the pitch black. Once again we struggled to find people who could lift the dev tank into a hot bath so that it would be hot enough to use but we managed well enough. Although I think I have increased sensitivity to some of the chemicals because the stop bath makes my nose burn and I can't breathe, so after the second time this happened I missed the stop bath out because it was burning me.

The Negatives

I think that my negatives came out very well exposed and contrasty enough to get some very sharp prints from. The negatives do not look washed out and flat but the blacks and whites can easily be distinguished in all of them.

Tuesday 2 December 2014

Differences between B+W and Colour


Darkroom

In the black and white darkroom the red lights that are used provide enough light for people to see the room and the equipment, this makes printing easier and quicker. However in the colour darkroom the paper is more sensitive to light so the room is completely light tight, the black lights that can be used do not provide enough light to see but give a vague outline of the layout of the room (indicating the corridor between enlargers and the corner where the printing machine is.
Working in the colour darkroom is more difficult as the blackness is very unnerving and makes navigating the area quite difficult, though I am confident that with time and practice I will become more accustomed to it and the printing will then be done with ease.


Negatives

The black and white negatives are easier to imagine the print as when first viewed as only the tones get reversed. However I can not work out the negative as colours get reversed and it is harder to imagine the way the colours will look before doing a contact sheet.

(insert pic of colour neg compared to contact sheet)


Processing

I enjoy processing the black and white films because I know how to do it and although I struggle with lining the tray up into the deep tanks I have a routine set up with my friend. With the colour film the university does not have the facilities to develop colour film so we had to send our films to DigiLab in Newcastle for them to develop, this had the problem of being delayed until their processing days (Mondays and Wednesdays - you can get on the day developing on these days if the prints are handed to them before 11am)


Preconceptions

Many people associate black and white with the old film photographs, because of this they feel that a photograph being black and white makes it more artistic or "real" although some people think that the world was black and white and colour has only recently been introduced to life.


Personal Opinion

I feel that both black and white and colour can create beautiful prints if done right; yet I prefer the black and white as I am more comfortable with the processing and printing. I think there is a value in colour prints as the quality is greater than digital and the photograph looks a better quality, this means that people would probably be more willing to buy the work.


Thursday 27 November 2014

Stephen Salmieri

http://www.salmieriphotographs.com/#a=0&at=0&mi=2&pt=1&pi=10000&s=0&p=0


These photographs are good inspiration for my photography as for the first workshop we are doing our 'task' is to photograph more than one person in the frame, the composition of the people within the frame can be used to tell more about the people : if one fills the frame more they become seemingly more important than the other, same with height as the taller person becomes the main focus as they are seen first. The way the people in the first two images have been posed shows us their relationship with the other people; the way they are touching in the first image appears to be a loving embrace which is strong and passionate whereas the second image is a gentle soft touch as there is a child between the couple.

The two last images are close ups showing just the persons face, these also show the personality and some background information about the person; the musical instrument connotes that the model is a musician.

Tuesday 25 November 2014

What Should I Budget for?


Well lets see what I will need for this project :

9.5*12 paper
£10 for 10 sheets

20*24 paper
£40 or £45 for 10 sheets

12*16 colour paper
£45 for 50 sheets

5*4 film
£2 per film (one film takes one photograph)

120 film
£5.50 per film (12 shots per film)

120 film developing
£5.70 per film


Hmm this is looking as though it is going to be an expensive module, lets just hope it all works relatively smoothly and I do not need to buy multiple packets of each paper.


Principles of Portraits


There are certain preconceptions people have when somebody says 'Portrait' many people think of highly make upped photographs of women as in our society the 'Selfie' has become a large part of the daily photography we are exposed too. People think of the scaling the phone automatically does and how the quality looks.

Typical art portraits have been done in portrait orientation as this how the person would be stood and be seen naturally, usually there is little in the background of a staged portrait as most are done in studio's or with a shallow DoF, straight portraits such as those in Street Photography can be both close up or environmental shots which show the background as well as that is part of the narrative within the photograph.

Many photographers compose their images to follow the Rule of Thirds; the invisible lines our eyes create through the photograph, and then their main focus of the photograph is on composed over where these lines would be. This 'rule' is a useful tool as it does lead the viewers eye around the image and can help with starting out photographers as it is a standard that people can understand and expect to be followed. However it does not always have to be in place as not all photographs follow the this rule as not all can, it depends on the subject.


When photographing people it is much easier to have a mid DoF as this means the background will still be out of focus and it allows the model some movement room as people can not freeze and stay exactly still in the same position for the length of time it takes to focus and take the shot. DoF is a useful way of making sure that the model is the main focus of the photograph as the background can not be made out as it would appear blurry.

Printing layouts are unlimited, but the most common way it is done is one photograph per paper with a white border around the photograph, many people have different views on the size that the border should be, personally I think that images should have a small border as this means the viewer is drawn into the image and can clearly see the edges of the photograph and the framing you as the photographer chose, plus it also helps when handling prints as any marks made will be over the border and not the photograph and it will not be as noticed.


Friday 21 November 2014

5*4 Photographers

Edward Weston


These photographs are environmental portraits which give more information about the person as it shows us their habitat and how they are living, it can also tell us why they are dressed as they are; the first subject is wearing simpler clothes that would be easy to mend if they got broken while working. the location looks more rural than the second image because of the planks of wood used on the building and the floor appears to be broken stones over mud.

I would not say the second photograph shows us much information about the perso as the details of his face can not be seen, I would say this is a generalisation of the business men in urban towns and cities; this man could be anybody you pass on the street but you can't tell because you can not see his face in this photograph.

I think it would be fun to experiment with not showing peoples faces and showing generalisations or stereotypes however this would maybe not fit into this brief of taking portraits to show who the person is as hiding the face would defeat this objective.


Paul Wakefield


These are also environmental portraits, one in landscape and the other in portrait, if the person works or lives in an interesting environment I think it would be interesting to show them in their location, this would also help the subject feel more at ease as they are somewhere they feel comfortable and they can and will relax more. 

I might take the camera out one night and shoot some people I know in their houses, as this will mean they are comfortable and I can take my time with the camera talking to them to make them feel more relaxed before I start to set up the shot, people on the street usually do not like to stop and chat as they have somewhere they would rather be and it will be starting to get colder.

Possible Ideas - Black and White


For the black and white photographs the brief says :

"produce prints in the black and white darkroom made from 5x4 negatives that explore shallow, mid and long depth of field portraits of strangers in a public place. "

I am going to take the camera into Church Square as this is easy for me to access both interesting backgrounds and a wide variety of strangers as people pass through here. People of all ages and occupations (such as college students to the retired gentlemen heading to Wetherspoons).

I do not want to do environmental portraits but photograph mid body as this shows the way the person is representing them-self and the detail in their face and still keeps some details in the background.

I am possibly going to photograph groups of people or couples as this adds more information about the person as it shows who they choose to hang around with. This will also challenge me as I have not photographed groups before and I think models will be more willing to model if they can be with their friends.

Wednesday 19 November 2014

30 Expressive Portraits

http://www.stockvault.net/blog/photography/30-expressive-portrait-photographs/


I think that the more the persons face fills the frame of the photograph the more detailed the expression becomes and the more eye catching it becomes because the person seems to become life size and as though they are they infront of you rather than in a photograph.

In my own photography I am going to look at doing close ups of people as more person less background seems appealing to me as sometimes backgrounds can be decieving about the person, sometimes the person would not choose to be in the location they have been photographed in. I also think that the closer in it is the more you can see about the person and the better the expression becomes because of the detail in their face.

Inspiring Dynamic Portraits


http://www.stockvault.net/blog/photography/inspiring-dynamic-portrait-photographs/

Majority of these portraits show the persons personality through the use of props, props can be anything as small as a cigarette right up too a plane. Most people carry items with them daily and any of these could be used as props, the items the person carries show how the person represents their self or would like to be seen as.

Props can also be a good way to get the person more relaxed infront of the camera as they feel as though the attention would be on the prop rather than them. Looking for people who are carrying small items could be a good way to get more natural looking photographs, rather than some nervous people who have been stopped in the street by strangers with a camera.

30 Captivating Photographs


http://www.stockvault.net/blog/photography/30-captivating-portrait-photographs/


These portraits show people in a wide variety of ways, both staged and straight and I like the differences between them, the photographer is showing their personality and capturing the models personality and feelings by the pose, the background, the composition, and the lighting set up.

Some images were high key which connotes positive feelings because the photograph is so well lit and bright, whereas some were low key which can connote negative feelings because of the darkness of the image but can also just be atmospheric purposes and to draw out the details of the face.

I am going to look more into the details of the faces of the models and I will be looking for characteristic faces when I go out shooting.

Thursday 13 November 2014

DoF workshop


DoF stands for : Depth of Field, it is a photography term used to describe the 'blurriness' of the background of the photograph, or sometimes it is in the foreground.

It means that whatever is being focused on will be drawing the attention of the viewer because the eye can easily distinguish what the subject is with little effort and it is easier for the eye to look at.

DoF should be understood by all photographers as it can be used effectively in all genres of photography, shallow DoF can be used in portraits and artistic still lifes to highlight certain areas of the objects and to make them stand out against the background. Large Dof works efectively with commercial shots where the product must be fully in focus so potential buyers can gain a complete vision of the product, and it also works for landscapes so that the foreground flowers and the field in the background can both be in focus and clearly seen.

It is always best to experiment with different DoF's in every shoot as sometimes when you think it might not look right it can lead you to getting a better shot than before.

DoF can quickly be changed by changing the F stop; a small number means that the DoF will be small (only a small amount in focus), and then as the number increases so does the range that is in focus, The position of the subject will also affect how the DoF looks, if the subject is closer to the camera the range of focus will be smaller and the further away the bigger the focus range will be. This is also true of moving the subject from the background, if the subject is near the background then most likely the background will be in the range of focus, to clearly see the DoF changing move the subject away from the background and take the same photograph three times on three different F stops, the background will change 'blurriness'

Thursday 6 November 2014

Editorial Evaluation


For this Editorial project I have looked at how people are changing as they become active on social media sites.  I looked at how people portray themselves online: many people edit their lives down and only show the best of themselves because they do not want people to see their real lives. My photographs look at how people are becoming lost to the version of their world they have created 
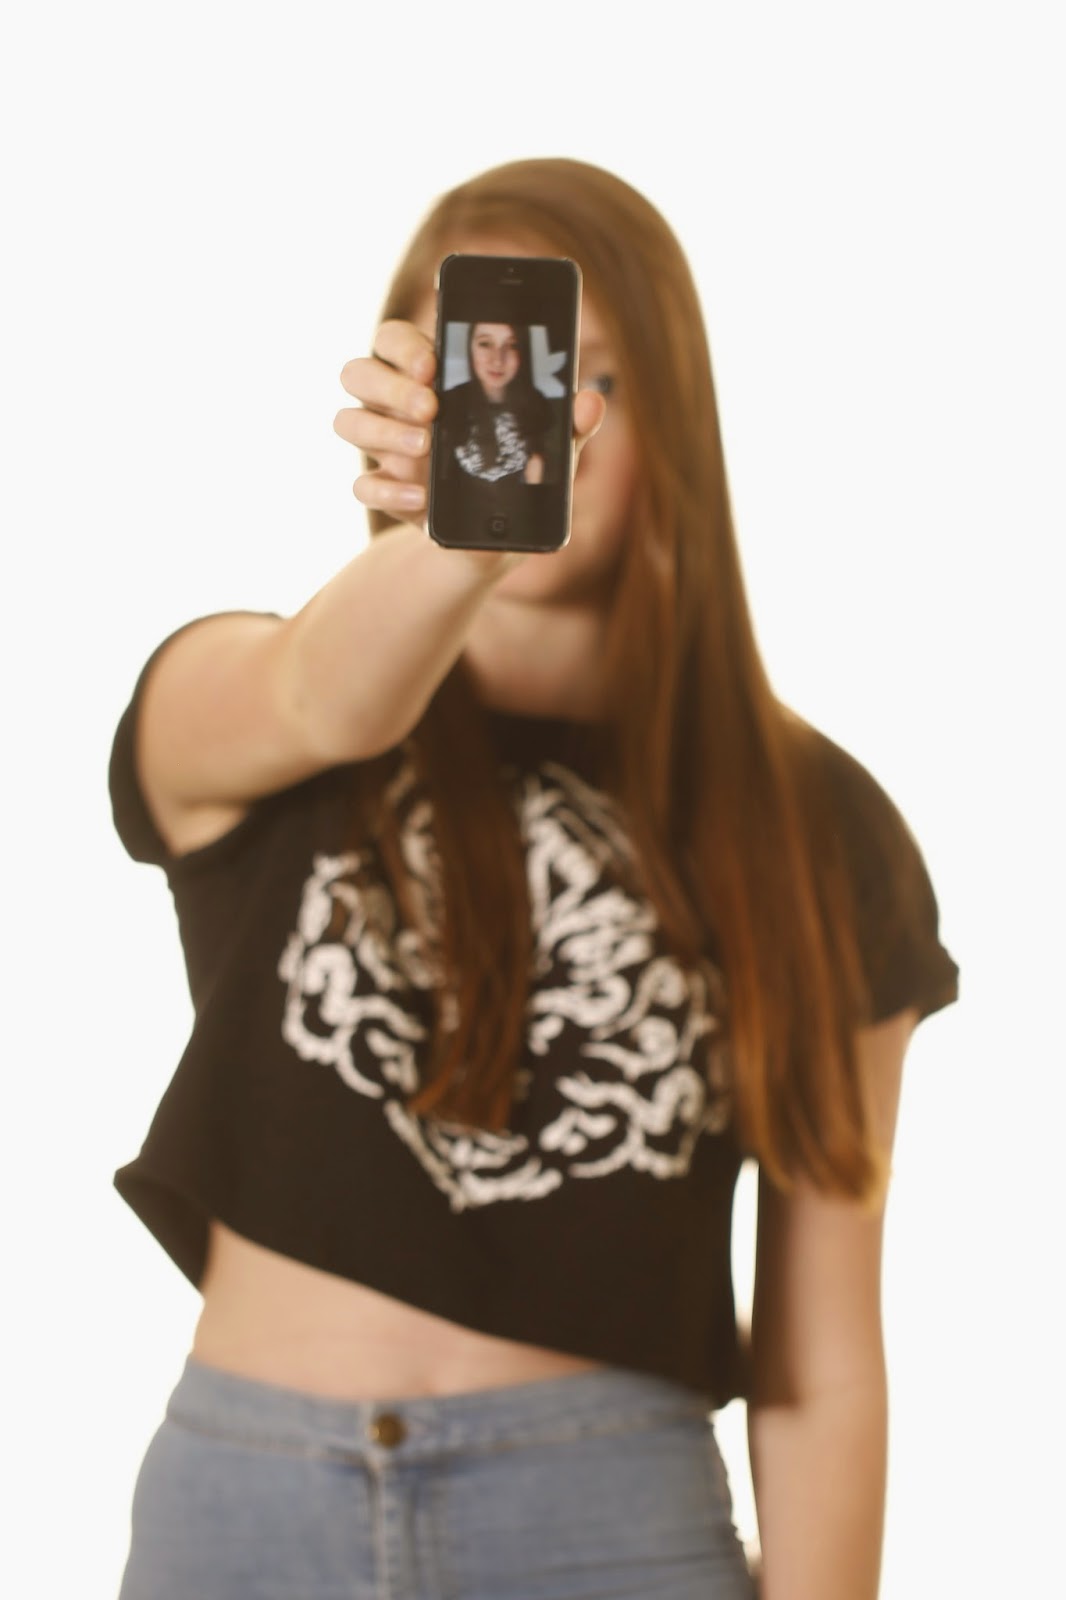
digitally and I feel that my photographs show this through the use of shallow depth of field with the focus on the mobile phone.

I have been influenced by society and modern culture: it is acceptable to take a ‘selfie’ during any activity and all ages can be involved; the only limit is the length of your arm. Many celebrities and powerful political people are becoming involved and the genre quickly became instantly recognisable by the simple styling of the photograph. Personally I do not understand the obsession with taking ‘selfies’ throughout the day just to post online for fun but exploring my own self-image during this project was intriguing.

I feel that my final outcomes have been successful in showing that people are losing themselves to technology, the depth of field showing the person through the phone was a symbolic way of showing people online because many social media sites have apps that can upload photographs straight from phones. My first idea I tried for this project was not as successful as I hoped for because when I showed people my work they did not see the image in the same way that I did so this made me stop and rethink my idea to find a way that people would be able to see my idea more clearly.

My images could have been improved if I continued with studio shooting as I feel these are more successful in showing the person becoming lost to the social media sites because the plain background makes them appear as though they aren’t in a location anymore and have been taken into the digital world.
I have used many different techniques for this shoot as I have explored a few possible ideas for my project. I enjoyed being able to develop my technique from in the studio to going out on location; in the studio I was shooting on ISO 100 and this meant the shutter speed was slowed down so in many of the images there is slight movement with the phone so the screen looks distorted. While I was on location I was using the natural lighting available so I raised the ISO and this allowed me a faster shutter speed that stopped the motion blur.

I did not encounter any major problems however one slight problem was that I struggled to manually focus the image so that the phone was sharp as the person could not remain still and each model was stood in a slightly different position so the focus point was constantly changing, to try and get the phone in focus I took multiple images changing the focus each time.

The weekly group critiques we had helped me to focus my idea as people did not understand what was I was trying to show with my first idea as I think I took the idea too far and did not make it literal enough to be easily understood. In a tutorial we discussed ideas how to improve my technique so that I was not getting motion blur, this helped me to greatly improve my photographs, as the focus of the image is more obvious.

I think this project has helped me improve my studio skills as I do not use the studio often and trying a new technique in the studio was difficult at first but once I got back into the studio I really enjoyed it.

This project as challenged my ability to work with models who I have never met before as the many of the models from the studio shoot were from around the university building and I have never talked to them before.  On location I was challenged again because I was working with younger models who did not want to sit still and pose for long while I was struggling to focus manually.

If I had the chance to start this project again I would not spend so long trying to make my first idea work and go right ahead with my second idea because this worked faster and easier and I feel that it gets my idea across that people are becoming lost to technology and social media sites. 


Tuesday 4 November 2014

Editorial Final Five


Martin Wilmsen - Biker Portraits


The shallow depth of field in these photographs are similar to what I am shooting, although in these images the entire face is in focus and has not been obscured the effect is still similar to what I would like.

I think the lighting that's been used helps to bring the focus onto the face as the biker has a halo around him which brings the viewer in. The colours used look muted and toned down which gives a calm and neutral atmosphere (many people stereotype bikers to be loud and aggressive and these images don't make me feel like that).


Monday 3 November 2014

Shoot Five


These images I have taken some more of my family because I was not happy with the amount of grain in the image because I had the ISO on around 3200 because any lower and the image was not exposing correctly. To correct this I shot earlier in the night when there was more light available and I also turned my camera from Manual to AV (I have been shooting in full manual for so long I have forgotten that I have other available options - whoops!) this meant I was not worrying so much about trying to work out the shutter speed as the lighting changed and I moved around the living room.

I have also asked my neighbor to model for me so that I can show a wider range of ages.

In the first five images I have asked my cousin to pose with my phone showing a selfie of him, although keeping a three year old still long enough to manually focus on the phone was hard I like the images of him looking through the photo album on the phone as it shows that even at three he can understand the mobile phone enough to be able to look through photographs to find himself.

I included the photograph of just the phone by itself because I liked how the shallow depth of field draws the viewer and in because there is no sign of the person in the photograph or of the owner of the phone.

The last two images are more of the people posing with the phones, in one image the model did not want to be photographed as they were but they had a "pre-approved" image that was taken previously before a date night. I think that this speaks more about how lost we are because the model wanted to completely change the perception of her by using a different selfie and not show people her everyday look, I think it shows just how much people edit their lives down for the online world because they do not look "perfect" everyday.


Thursday 30 October 2014

Shoot Four


These images I took during one night that my family were visiting, I think that showing a range of ages all taking selfies and becoming lost to technology is going to be more effective than just asking young adults who the technology is aimed at.


Friday 24 October 2014

Noah Kalina's - Everyday


https://www.youtube.com/watch?v=iPPzXlMdi7o


In this video Noah Kalina has taken a 'selfie' everyday for 12.5 years and has compiled them in this video, this project is not the only one of its kind however it is the longest I have seen the project being completed for.

I think it's extraordinary to see the changes that he goes through over time as during the course of his life he won't see the little changes that happen daily (the effects of ageing) however watching the time lapse video of his life it becomes obvious that he is changing.

First Ever Selfie?


http://publicdomainreview.org/collections/robert-cornelius-self-portrait-the-first-ever-selfie-1839/


Although the genre of 'selfies' did not exist when photography was first invented there was self portraiture and Robert Cornelius did just that, he exposed the film himself and posed for a minute to get a photograph of himself.

The image is thought to be the first photographic portrait taken, showing that 'selfies' have been around for longer than we thought. Self portraits were common when photography was just starting out because it was easier for the photographer to model so that they could practice techniques and exposures.

Not everybody agree's that this image is a 'selfie' because of how the Oxford dictionary has defined the genre, according to the definition given I would say that this image is not a 'selfie' but a self portrait, however this image predates mobile phones so I think that the image can be classed as a 'selfie' because of the limited technology available.

Thursday 23 October 2014

#trulyrich


Chevrolet

This two minute commercial for Chevrolet shows us how the world is happening around us while we are taking pictures to post online, sometimes while trying to take the perfect image we forget that imperfection is part of life and that we should celebrate it.

This commercial shows us that we should not try and show off for people online but we should be enjoying the moments we are trying to capture.

The narrative in the advert shows a family who are enjoying daily life, but it shows the mum is missing out on laughing with the kids because she is trying to take the perfect image of the cake and how the dad isn't playing with his kids because he is taking pictures.

Other short clips were also made for the campaign, some show a series of "perfect" images but then the last image shows what truly matters; for example the window seat clip shows many images looking out from an aeroplane window seat however what really matters is that you are with somebody you care about.


http://stocklandmartelblog.com/2013/11/21/lauren-greenfield-shoots-stills-directs-commercials-for-trulyrich-chevy-malibu-campaign/


Lauren Greenfield

She has directed the commercial and she has used some of her own images as the selfie that the model has took, she says she looked at how the models would take pictures of themselves or how the dad would take pictures of the children and tried to make her images look as candid and real as possible, I think this has worked because all of the images look as though they are real and have been taken by the family. She says that she was going to let the images be taken as the shoot was acting out however she realised that the photographs would be a key aspect of the advert so she has used a combination of both her own work and letting the photographs been shot on set.


Selfie City

http://www.selfiecity.net/


This website shows the details of research done into THE SELFIE.

They have compared thousands of selfies from cities across the globe and have made an imageplot which is a large grid of all the selfies and how the people have posed themselves (head tilting). The graphs can be compared to see how the cities have different social standards on how they want to be perceived.

Through surveying selfies they found that many people tag images as selfies even if it is of food, pets or places.  They also looked into the age range of selfie takers and the gender percentage, they found that in younger people there was a higher percentage of women, but there was a higher percent of older men than older women.

Shoot Three


These images I took in the studio using a shallow depth of field (f2.8) I have chosen to focus only on the phone and the hand that is holding it to show how people have become obscured by their images they display proudly online, I am showing that people are losing focus and becoming lost to how many "likes" they can get on a photograph. I wanted to show that the person has become lost and I have done this by shooting in the studio on a plain background.

Kanji Ishii


http://theredlist.com/wiki-2-16-860-898-31-85-view-beautiful-still-life-profile-ishii-kanji.html#photo


The composition used in this image is very well thought out as it looks natural as though the model has just been handed the tablet and she is holding the tablet as though she is looking at it from the viewers perspective, this draws the viewer in as they feel like they are becoming the model in that they can have the products that are being advertised. I think this image shows how society is changing as an advert for jewellery is being advertised through a piece of technology.

Tutorial


Notes :

research into the "fetishization" of the phone

develop the technique so that flash exposes the person / phone in one (to stop phone shake)

compare a 'selfie' with 'straight' portrait (ask the person to have a natural expression)


After the tutorial :


I went straight to the technicians to see if they had any technique ideas about being able to one have a faster exposure and they said increasing the ISO might work to show the phone screen as well as the person, or to just ask the person to be reaaaally still.

Tuesday 21 October 2014