Wednesday 11 December 2013

Colour


I found these images while looking into creative ideas in the studio, they have been taken by using coloured gels and this is something that I would love to try in the studio sometime in the future (probably not this project as I would have to rush to get the gels and learn how to use them fast, I would prefer to be able to take more time learning with them and experimenting with different outcomes)


Julian Cash


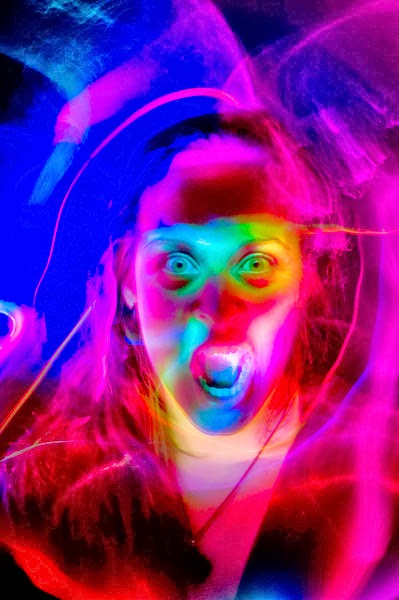
These images have been taken in the studio using torches and light painting, I would like to try creating something similar by using coloured gels on the lights and torches. (I have done light painting before but only using one torch and colour so it would be fun to use more than colour at a time.)


http://www.juliancash.com/view/jc_edible/set/large_foo_1503.html
http://www.juliancash.com/view/jc_edible/set/large_foo_1606.html

http://www.juliancash.com/view/jc_edible/set/large_foo_1479.html


Scott Chalmers

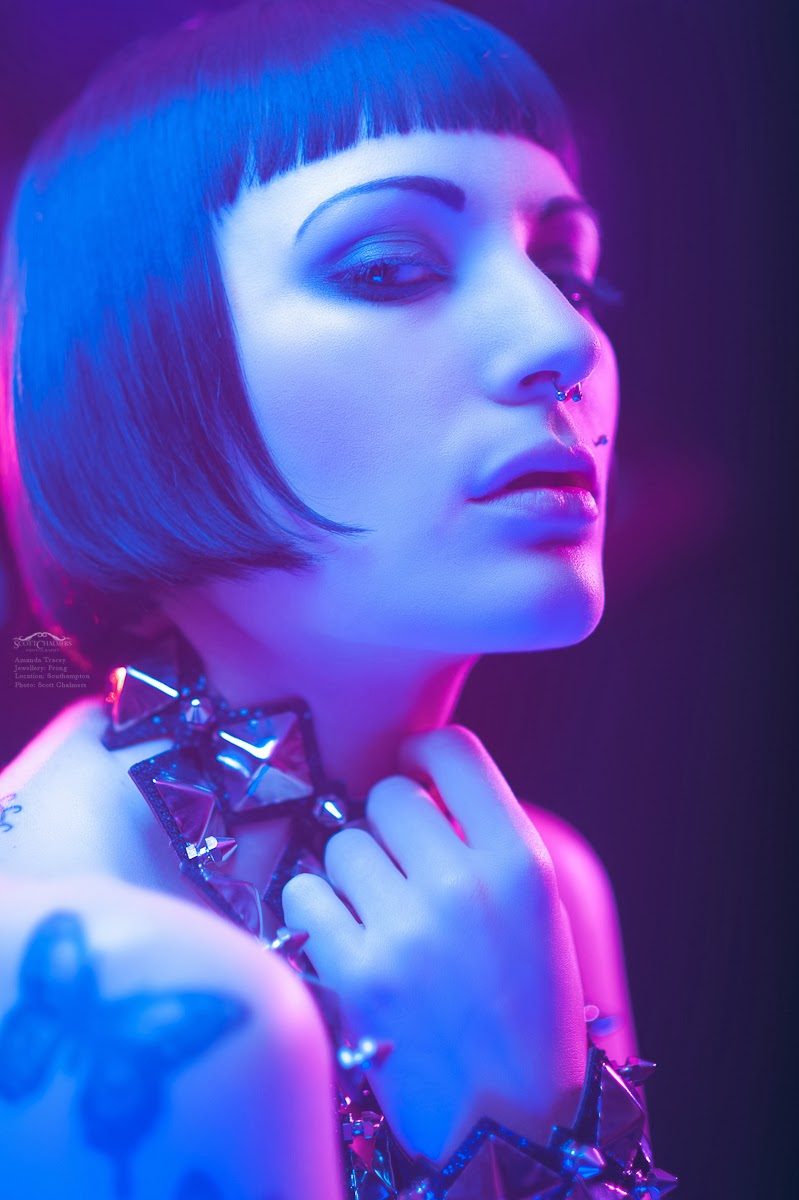
These have been taken using coloured gels over the top of the lights in the studio, using coloured gels is easier and faster than spending time retouching in Photoshop to get the same effect. Plus while shooting if the lighting does not look exactly right for each individual pose the model is doing it can be easily changed whereas on Photoshop it would take hours to adjust each image separately.


Neil van Niekerk


The coloured gels don't always have to be used on the model, they can also be used to add some colour into the background like in these images:


I like the way the background adds a dramatic effect and looks to me as though an orange coloured backdrop has been used instead of using a gel. This is easier than buying different coloured backgrounds and having to re-set up the backdrop for each shoot or even during shoots.


DIY


I had not heard of using coloured gels over the lights so this is something that interests me, so that I could practise easier and quicker than with buying gels (because I have no idea which are good and which aren't) I looked into how to create home made coloured gels, on a website called Digital Camera World I found an idea that I am going to try... cutting up plastic wallets, only I am going to use the coloured section dividers in an old notebook.

DIY Photography Hacks : macro studio

Wednesday 4 December 2013

Studio Artists


Denis Firman


I love the use of shadows within the photographs as it puts the model into a location instead of being just on a white background as sometimes the model looks a little lost within the photograph as there is only negative space around them.


Steve Kraitt

http://www.kraitt.com/#a=0&at=0&mi=2&pt=1&pi=10000&s=0&p=0


http://www.kraitt.com/#a=0&at=0&mi=2&pt=1&pi=10000&s=0&p=0

I think the effect created within these photographs are unusual and different and I would love to try creating my own similar photographing using light painting.


Lutz Mahnhardt


http://www.mahnhardt.de/people/studio/studio.html


http://www.mahnhardt.de/people/studio/studio.html
These studio portraits are quite simple in their composition and I would like to create similar style photographs, showing the personality of the models.


Dan Newton


http://www.liquidinplastic.com/2011/02/val-in-the-snow/

For the theme of this project I would also like to focus on people with hats, gloves and scarves on to cover themselves from the cold, I think this will help keep the model relaxed if they are not used to being infront of a camera as they will feel better having some shelter from the camera. It also means that plenty of models will be available as people will be wrapping up warm now it is winter.


Studio Time


For this terms project we are getting introduced the equipment in the Uni's studio rooms, then being split into two groups within our class and working together to create portraits of each other using a Hasselblad camera with a Phase One digital back rather than shooting film.

We will be sending photographs to be professionally printed at the end of the project so I cant wait to see how those are going to turn out.

After getting shown into to the studio we went through how to safely set up lights and health and safety measures in the studio :
  • tape down wires, so nobody trips over
  • set up the light so the flash is facing a leg, this means it is sturdier
  • no food or drinks in the studio, incase of spillages
  • take the cap off the light before switching it on, the cap will melt within 10 secs
  • wait for the lights to cool down before replacing lights cap, same as above
  • turn to the lowest flash power and discharge all energy before turning off
  • do not leave flashlights without some sort of cover or attachment on them, if people knock them there is less chance of the bulb breaking
  • wrap the power cable around the bottom of the tripod, if the wire is pulled it will pull the tripod not the light
  • when changing the light fittings ensure they are properly dis/connected 
  • ensure the electrical equipment is PAT tested 
There are also some general tips to working with models in the studio as well :

  • use model release forms
  • inform them of exits and fire drills
  • be careful of what might hurt the model, certain poses may only be achieved for a certain amount of time and costumes may be heavy, help the model anyway possible


We have been shown different lighting style set ups such as frontal, glamour, rembrandt and slight side and asked to create them ourselves, I took photographs using each set up however between shooting and transferring them over to my student account I have lost the Capture One session details so I am unable to open them.

Paintings

To start my research I am going to look at painting because photography is an evolution of paintings and many of the lighting setups we use now had been used in paintings beforehand. Painters would typically use windows at the side of their models to generate the light, such as in Jan van Eycks " The Arnolfini Portrait " this is why we now use the flash light at the side of model to recreate this effect.

Jan Van Eyck - " The Arnolfini Portrait "

Van Gogh also used side lighting in his work, although this could be from many different light sources as most of his work is close ups of the models, I can see the line down the side of the nose where the shadows start.

Head of a woman with her hair loose


Another style of lighting developed from paintings is the slight side lighting seen in Vermeer's " Girl with the pearl earring " and Leonardo Da Vinci's " Mona Lisa "

 
Mona Lisa
Girl with the pearl earring


Now the hardest part is deciding on a theme for my photographs, hmmmm....

Friday 8 November 2013

Final Five


Please let me know what you think in the comments below.
Thank You.


Project Evaluation


For this project I have taken my film from different viewpoints including; on the floor, eye level and looking down from an eighth floor window. I chose this theme because every bodies view on life is different, varying from just height to how people have lived.

The main artist influences I have had during this are; Alexey Titarenko, Tom Wood and Rui Palha. The artist’s work I have looked at shows different viewpoints such as from on the floor and looking down at people, researching their work has helped inspire my own photographs.

I feel as though this project has been successful because I have followed the brief to create my prints. Although I may have gone slightly off genre by choosing rural paths to photograph in contrast to the urban streets which are typical of 'Street Photography.'

My work could be improved by using the filters while I am printing as some of my prints look washed out and mid tonal, there is not a lot of contrast within them. Would also need to push my comfort zone limits, as many opportunities have been lost due to me not having the confidence to press the shutter.

This work has been taken using a film camera with HP4 black and white film, all of my rolls of been taken on ISO 400 so I have used the standard 1-3 developing method, not using push/pull. In the darkroom I started exploring filters and how to split grade, but I still need to practice more with these.

One major problem I encountered was my lack of confidence while out shooting; this is something I am continuing to work on. Another problem I had was while shooting my final roll of film the camera I was using broke as the shutter jammed this meant instead of getting thirty six exposures I only have twenty six.

Halfway through the project we had a group critique and evaluated each other’s work and I received many positive comments about my work. Plus some constructive criticism about my prints being slightly out of focus, which was because the enlarger lens was broken and when I reprinted them with a different lens they were in focus. I also got a comment about where I should go with my next shoot and that was a success.

I feel I developed skills in both printing in the darkroom and exposing photographs while out shooting. The camera I have used throughout this brief has not had an in camera light meter so I have used an analogue light meter however it was not very accurate so I have managed to estimate the aperture on my photographs.

The assignment has challenged me to push my confidence and start to ask people if I could have permission to photograph them. A few of my rolls have the back of people’s heads because I did not feel comfortable photographing them.


If I were to do this project again I would try exploring more locations for my shoots, I would also try photographing people while I am on the bus, I was not sure about the bus policy on doing this so I have not done so.

Deadline...


DEADLINE WEEK

Eeek! It's deadline week already (the project seems to have flown by) so all I need to do is now print my final chosen images and write my evaluation.

I have explored using filters and I think I have got used to them and how to work them but I am still a little unsure of things.


*Update*

DEADLINE DAY

My pints are all finished and are waiting in the portfolio box to be handed in, they have been protected and covered since they finished washing and drying in the darkroom as I had to reprint one because it got slightly damaged.

My evaluation is completed at 533 words long (I do feel like I was rambling a little though, it has been a while since I evaluated a project) 

All thats left is burning the JPEGS and TIFF's onto a CD disc.


Last rolls of film


So I'm down to my two final rolls of film now and I have gone out and shot some more from eye level as I do not feel my previous ones were very successful. However I was more cautious about who's photograph I was taking because of being asked to delete a photograph before on my previous shoot.

These photographs are not as good as I feel they can be as they are not as creative as my other rolls, I do not think these rolls of film will make the final five selection as I have more creative and aesthetic photographs. 


While I was out shooting the final roll the shutter on the camera jammed and I only managed to expose 26 instead of getting the full 36. (I'm not happy about the camera breaking, but I'm glad its on my final roll)

Getting into Deadline Week

For my final five I am thinking of comparing the rural paths to the urban streets. I will have two rural paths and three urban street prints to show the differences. I hope that I have been successful in making prints that are not the stereotypical street photographs yet are still within the genre.

I am going to explore with using filters while printing as some of my prints do not have much contrast in them and I hope to increase it.

Thursday 7 November 2013

Post Crit


So during the Crit, I received a comment about a shoot I can do in the future, so I went out and shot it (once it stopped raining and the floor was not a permanent puddle.) 

So I researched into artists who have photographs that have been taken from floor level and found Rui Palha

Just a bit of lighting

|

En passant...

*Update*

It turned out quite well, I got some interesting photographs of people as they didn't seem to notice me sat down on the floor in the corner. Well one woman noticed me and asked me to delete the photograph of her but with me shooting film I couldn't, so instead I have not enlarged the print even though my tutor had told me he liked that shot.

I think a couple of photographs from this roll might make it into my final selection as they are creative and unusual.

Wednesday 23 October 2013

So far so good


After the Crit the other day I took some photos of the work I have done so far so I can share it with you all (and hopefully get some comments on what you think). 

High Viewpoint:


Eye Level:


And for my next shoot I will be getting down onto the ground and shooting from a low level, hopefully if the rain stops and the floor dries up a bit ( I don't really fancy getting a nice wet patch) 


Wednesday 16 October 2013

Preparing for the Crit


So today we are having a group Crit of the work we have done so far. Crits in the past have made me nervous because in college we had to sit at the front of everybody and show off all of our work including artist research and how we developed our shoots rather than showing just the finished work, which is what we are doing in Uni, I prefer only showing finished prints because I know they are a good standard and I am proud to show them off (even if I do have a tendency to think to negatively about my own work even if I know it is good)

I think I am also less nervous about this crit because while I have been doing the developing process people have seen my work and I have received a few compliments already.

*Update*

The Crit went well, I received many positive comments about my work which I am very happy with, and the main negative comments were that a few of my prints were out of focus, which wasn't my eye the lens in the Enlarger had broken so one half of the prints was slightly out of focus but this can be fixed by a simple re printing. 

I also had a comment given to me about where and how I can take my next shoot which is a great idea so I've planned that for this weekend.


Tuesday 15 October 2013

Inspirations from different places


I was scrolling through my newsfeed on Google+ when I came across a photograph that I liked so I googled the photographer and found his street photography work.


T. Malachi Dunworth


Russian Hill


Big Space

For my Street Photography project I have decided I would like to focus more on viewpoints. These images are taken from a high viewpoint which could be seen as looking down on people as though the photographer is better than the people within the photograph but I feel like he is just exploring different places and how he can show them in an unusual way rather than from just eye level.


Tom Wood

After talking with my lecturer about the shoot I had tried to do on the bus he mentioned I should look at Tom Wood, as he travelled around his hometown on the busses photographing the locals.

Tom Wood, Mill Street, Dingle, England, 1988
I like how in this photograph the viewer feels like they are sat on the bus looking behind them out the window. I would like to compare the inside and outside of the bus especially in different weather conditions such as when it is raining. 


Tom Wood, London Road, City Center, UK, 1993
In this photograph he is stood at the bus stop looking through the glass in the rain, I like the way the people are oblivious to him as they look as though they are preoccupied with an approaching bus. I think that if the people had been looking at him it would change the atmosphere in the photograph and it would not have been as effective.


Louis Strettner

While searching for Tom Wood I came across a website The Red list, and it has a wide variety of different genres of photography including Street Photography. 

Louis Stettner, Broadway Limited, Penn Station, New York
The movement of the man in this photograph makes me feel like he is running to catch his train, I could take this style and use it to photograph people who are late for their bus or generally running.


Louis Stettner, Six Lights, Penn Station, New York City, 1958
In this photograph the people have been framed so they are facing away from each other like she is leaving him behind. I like how they are the only two people in the photograph because the sole focus is on them. The line of lights leads the viewer down towards the man because he would not be noticed straight away otherwise.


Wednesday 9 October 2013

Get the bus not blisters


Yesterday I loaded another film into my camera and I set off on my journey home from university, I have a two hour bus journey home so I thought it would be good to photograph people as they went past the window. Only problem was there was barely any people walking on the side that I was sat on, they were all on the other side but I couldn't switch seats as the bus was full.

When I got back into the bus station I thought it would be better to walk home instead of getting the second bus home as it would give me a greater chance of finding people to photograph (which it did) but I had forgotten how far away from the bus station I actually live so now I have a nice big blister on the bottom of my foot ( I really hope its worth it.)

I'm not walking home again, I'll stick to my bus.


I'm going to develop both the superman in the park roll of film and this latest film today so I'm really hoping that they work out and everything goes well.


*Update*

Both rolls of films came out well developed however some negatives were slightly over exposed (which isn't bad for not having a light meter)